
Deploy Gemma 7B with TensorRT-LLM
TensorRT-LLM offers an optimized runtime to efficiently perform inference on NVIDIA GPUs. Although it requires some more technical understanding than other optimised backends like vLLM or Exllamva2, the performance is well worth it.
In this tutorial, I will cover how to convert a PyTorch model (Google's Gemma 7B) into TensorRT-LLM format, and deploy on our serverless cloud or on your own private cloud with Mystic. We have a cloud integration that allows you to get a scalable endpoint running directly on your own cloud account for greater privacy and scale, with 0 engineering overheads.
After deploying you should expect this kind of 🔥 performance on an A100 GPU:
| Batch size | Output tokens | Throughput (tok/s) | Latency (s) |
|---|---|---|---|
| 1 | 100 | ~72 | ~1.32 |
| 8 | 100 | ~550 | ~1.45 |
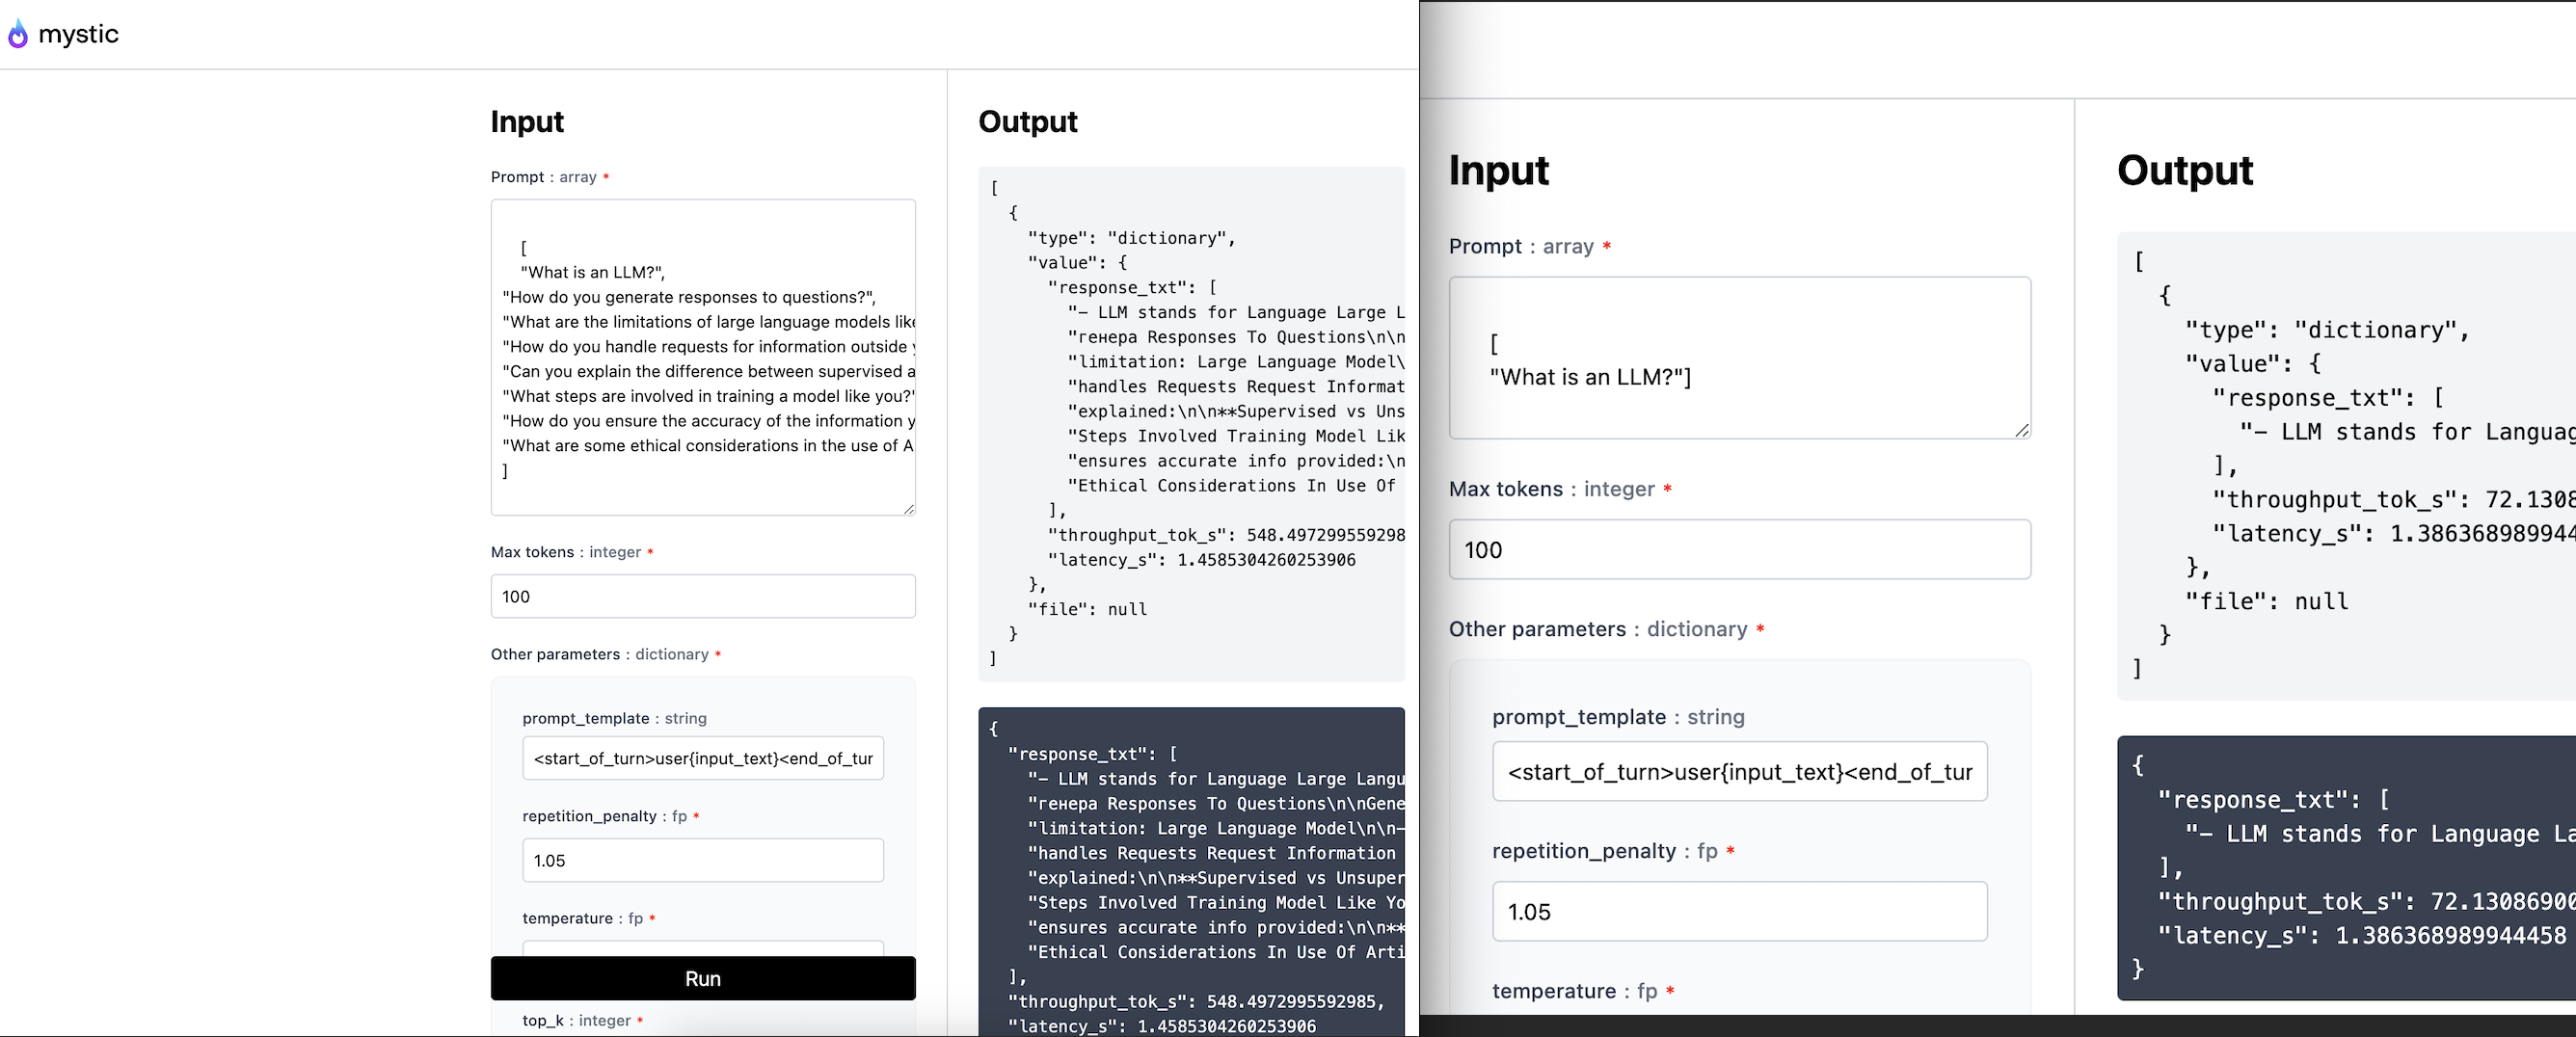
On the left the batch_size=8 test and on the right the batch_size=1 test
Try the live demo for free
We have this model deployed here: https://www.mystic.ai/google/gemma-7b-it-trt/play
Part 1/2. Download weights and convert to TensorRT format
If you don't need to convert your pytorch weights and you already have the TRT engine, you can skip this section and go to the tutorial down below.
This section of the tutorial covers how to convert a PyTorch model to TensorRT. To achieve this, we need to be in a GPU machine, ideally the same machine type as your target when deploying.
First, make sure your machine already has CUDA 12.1 installed (Note: I haven't tested with other more recent CUDA versions and it may or may not work). You can check which CUDA runtime version you have by running nvcc --version. If you don't have 12.1, you can install it by following https://developer.nvidia.com/cuda-12-1-0-download-archive, and if you have a newer CUDA version you can adventure and see if it works too! 🫡
Let's start by installing TensorRT-LLM and other packages required to do the conversion. We will create a conda environment and install everything required, in your terminal run the following (assuming you have conda installed);
conda create -n trt python="3.10" -y
And activate it with conda activate trt. Make sure to install the following packages;
sudo apt-get update && sudo apt-get -y install openmpi-bin libopenmpi-dev
pip install tensorrt_llm -U --pre --extra-index-url https://pypi.nvidia.com kagglehub flax h5py mpmath==1.3.0 sentencepiece easydict
We will also need to clone the TensorRT-LLM repo since we need one of the files in the repo to convert the Gemma model, in your directly download the repo by running git clone https://github.com/NVIDIA/TensorRT-LLM.git
Now that all packages are installed, let's download the model from Kaggle hub and convert the weights into the TRT format.
Note: To download and use Google's Gemma model family, you will need to accept their license, which you can do so with your Kaggle account (which you need in order to download the model weights).
In your current directory, create a file named download_and_convert.py and paste-in the following code. Just make sure to update the KAGGLE_USERNAME and KAGGLE_KEY with your own;
import os
import subprocess
from pathlib import Path

import kagglehub

# Update the following with your Kaggle username and key
os.environ["KAGGLE_USERNAME"] = "YOUR_USERNAME"
os.environ["KAGGLE_KEY"] = "YOUR_KEY"

torch_weights_dir = kagglehub.model_download(f"google/gemma/pyTorch/7b-it")

# Create the directory where we will save the TRT engine. This is the file we will be deploying.
model_dir = Path(os.getcwd() + "/trt-engine").expanduser()
model_dir.mkdir(parents=True, exist_ok=True)

# Build the TRT engine
part1 = f"""
python ./TensorRT-LLM/examples/gemma/convert_checkpoint.py \
    --ckpt-type torch \
    --model-dir {str(torch_weights_dir)} \
    --dtype bfloat16 \
    --world-size 1 \
    --output-model-dir {os.getcwd()}
"""

part2 = f"""
trtllm-build --checkpoint_dir {os.getcwd()} \
             --gemm_plugin bfloat16 \
             --gpt_attention_plugin bfloat16 \
             --max_batch_size 8 \
             --max_input_len 3000 \
             --max_output_len 100 \
             --context_fmha enable \
             --output_dir {str(model_dir)}
"""

print("Building engine...")
subprocess.run(part1, shell=True, check=True)
subprocess.run(part2, shell=True, check=True)
print("\nEngine built successfully! You can find it at: ", model_dir)
Now just run python download_and_convert.py and your newly created engine should be now in the /trt-engine folder. Nice! Let's move into how to deploy this TRT engine in the next section.
Learn more about what each parameter from the build command means at the official TensorRT-LLM repo.
Part 2/2. Deploy TensorRT-LLM to Mystic
Let's start by creating a container project. In your terminal, after installing the latest pipeline-ai package, run the following:
pipeline container init -n gemma-7b-it-trt
In the directory you will see 3 newly generated files, a README, a .py, and a .yaml file.
On the auto-generated python file, replace its content with the following:
import csv
import sys
import time
from typing import Optional

import numpy as np
import torch

sys.path.insert(0, "/app/TensorRT-LLM/examples")
import tensorrt_llm
import tensorrt_llm.profiler
from tensorrt_llm.logger import logger
from tensorrt_llm.runtime import PYTHON_BINDINGS, ModelRunner
from utils import load_tokenizer, read_model_name

from pipeline import Pipeline, Variable, entity, pipe
from pipeline.objects.graph import InputField, InputSchema

if PYTHON_BINDINGS:
    from tensorrt_llm.runtime import ModelRunnerCpp
# logger.set_level('error')

# TensorRT params
engine_dir = "/app/trt-engine"
tokenizer_dir = "/app/gemma_pytorch/tokenizer/tokenizer.model"


class Kwargs(InputSchema):
    temperature: Optional[float] = InputField(
        0.95, title="Temperature", description="The temperature to use for sampling."
    )
    top_k: Optional[int] = InputField(
        100, title="Top k", description="The number of tokens to sample from."
    )
    top_p: Optional[float] = InputField(
        1.0, title="Top p", description="The cumulative probability to sample from."
    )
    repetition_penalty: Optional[float] = InputField(
        1.05, title="Repetition penalty", description="The repetition penalty to use."
    )
    prompt_template: Optional[str] = InputField(
        "<start_of_turn>user\n{input_text}<end_of_turn>\n<start_of_turn>model\n",
        title="Prompt template",
        description="The template to use for generation.",
        optional=True,
    )


# Put your model inside of the below entity class
@entity
class MyModelClass:
    @pipe(run_once=True, on_startup=True)
    def load(self) -> None:
        # Perform any operations needed to load your model here
        print("Loading model...")
        runtime_rank = tensorrt_llm.mpi_rank()

        use_py_session = False

        self.model_name, self.model_version = read_model_name(engine_dir)

        self.tokenizer, self.pad_id, self.end_id = load_tokenizer(
            vocab_file=tokenizer_dir,
            model_name=self.model_name,
            model_version=self.model_version,
        )

        if not PYTHON_BINDINGS:
            logger.warning(
                "Python bindings of C++ session is unavailable, fallback to Python session."
            )
            use_py_session = True

        runner_cls = ModelRunner if use_py_session else ModelRunnerCpp
        self.runner = runner_cls.from_dir(engine_dir=engine_dir, rank=runtime_rank)

        print("Model loaded!")

    def parse_input(
        self,
        tokenizer,
        input_text=None,
        prompt_template=None,
        input_file=None,
        add_special_tokens=True,
        max_input_length=923,
        pad_id=None,
        num_prepend_vtokens=[],
        model_name=None,
        model_version=None,
    ):
        if pad_id is None:
            pad_id = tokenizer.pad_token_id

        batch_input_ids = []
        if input_file is None:
            for curr_text in input_text:
                if prompt_template is not None:
                    curr_text = prompt_template.format(input_text=curr_text)
                input_ids = tokenizer.encode(
                    curr_text,
                    add_special_tokens=add_special_tokens,
                    truncation=True,
                    max_length=max_input_length,
                )
                batch_input_ids.append(input_ids)
        else:
            if input_file.endswith(".csv"):
                with open(input_file, "r") as csv_file:
                    csv_reader = csv.reader(csv_file, delimiter=",")
                    for line in csv_reader:
                        input_ids = np.array(line, dtype="int32")
                        batch_input_ids.append(input_ids[-max_input_length:])
            elif input_file.endswith(".npy"):
                inputs = np.load(input_file)
                for row in inputs:
                    input_ids = row[row != pad_id]
                    batch_input_ids.append(input_ids[-max_input_length:])
            elif input_file.endswith(".txt"):
                with open(
                    input_file, "r", encoding="utf-8", errors="replace"
                ) as txt_file:
                    input_text = txt_file.read()
                    input_ids = tokenizer.encode(
                        input_text,
                        add_special_tokens=add_special_tokens,
                        truncation=True,
                        max_length=max_input_length,
                    )
                    batch_input_ids.append(input_ids)
            else:
                print("Input file format not supported.")
                raise SystemExit
        if model_name == "GemmaForCausalLM":
            batch_input_ids[0] = [tokenizer.bos_token_id] + batch_input_ids[0]

        if num_prepend_vtokens:
            assert len(num_prepend_vtokens) == len(batch_input_ids)
            base_vocab_size = tokenizer.vocab_size - len(
                tokenizer.special_tokens_map.get("additional_special_tokens", [])
            )
            for i, length in enumerate(num_prepend_vtokens):
                batch_input_ids[i] = (
                    list(range(base_vocab_size, base_vocab_size + length))
                    + batch_input_ids[i]
                )

        if model_name == "ChatGLMForCausalLM" and model_version == "glm":
            for ids in batch_input_ids:
                ids.append(tokenizer.sop_token_id)

        batch_input_ids = [torch.tensor(x, dtype=torch.int32) for x in batch_input_ids]
        return batch_input_ids

    @pipe
    def predict(self, prompt: list, num_tokens: int, kwargs: Kwargs) -> dict:
        # Perform any operations needed to predict with your model here
        print("Predicting...")

        if len(prompt) > 8:
            raise ValueError(
                "The number of batched prompts must be less than or equal to 8."
            )

        # # An example to stop generation when the model generate " London" on first sentence, " eventually became" on second sentence
        # stop_words_list = [[" London"], ["eventually became"]]
        # stop_words_list = tensorrt_llm.runtime.to_word_list_format(stop_words_list, tokenizer)
        # stop_words_list = torch.Tensor(stop_words_list).to(torch.int32).to("cuda").contiguous()
        stop_words_list = None

        # # An example to prevent generating " chef" on first sentence, " eventually" and " chef before" on second sentence
        # bad_words_list = [[" chef"], [" eventually, chef before"]]
        # bad_words_list = tensorrt_llm.runtime.to_word_list_format(bad_words_list, tokenizer)
        # bad_words_list = torch.Tensor(bad_words_list).to(torch.int32).to("cuda").contiguous()
        bad_words_list = None

        batch_input_ids = self.parse_input(
            tokenizer=self.tokenizer,
            input_text=prompt,
            prompt_template=kwargs.prompt_template,
            pad_id=self.pad_id,
            model_name=self.model_name,
            model_version=self.model_version,
        )
        input_lengths = [x.size(0) for x in batch_input_ids]

        time_begin = time.time()
        with torch.no_grad():
            outputs = self.runner.generate(
                batch_input_ids,
                max_new_tokens=num_tokens,
                max_attention_window_size=None,
                sink_token_length=None,
                end_id=self.end_id,
                pad_id=self.pad_id,
                temperature=kwargs.temperature,
                top_k=kwargs.top_k,
                top_p=kwargs.top_p,
                num_beams=1,
                repetition_penalty=kwargs.repetition_penalty,
                stop_words_list=stop_words_list,
                bad_words_list=bad_words_list,
                output_sequence_lengths=True,
                return_dict=True,
            )
            torch.cuda.synchronize()

        time_total = time.time() - time_begin

        output_ids = outputs["output_ids"]
        sequence_lengths = outputs["sequence_lengths"]

        batch_size, num_beams, _ = output_ids.size()
        generated_texts = []
        generated_ids = []
        for batch_idx in range(batch_size):
            inputs = output_ids[batch_idx][0][: input_lengths[batch_idx]].tolist()
            input_text = self.tokenizer.decode(inputs)
            print(f'Input [Text {batch_idx}]: "{input_text}"')
            for beam in range(num_beams):
                output_begin = input_lengths[batch_idx]
                output_end = sequence_lengths[batch_idx][beam]
                outputs = output_ids[batch_idx][beam][output_begin:output_end].tolist()
                output_text = self.tokenizer.decode(outputs)
                generated_ids.append(outputs)
                generated_texts.append(output_text)

        generated_tokens = sum([len(x) for x in generated_ids])
        print(
            f"Response generated in {time_total:.2f} seconds, {generated_tokens} tokens, {generated_tokens / time_total:.2f} tokens/second"
        )
        print(f"Batch size: {batch_size}")

        print("Prediction complete!")

        return {
            "response_txt": generated_texts,
            "throughput_tok_s": generated_tokens / time_total,
            "latency_s": time_total,
        }


with Pipeline() as builder:
    prompt = Variable(
        list,
        default=["What is an LLM?"],
        title="Prompt",
        description="The input prompt to generate a response to. Add multiple \
          prompts to generate multiple responses. Single API calls with multiple\
            prompts is more efficient than multiple API calls with single prompts.",
    )
    num_tokens = Variable(
        int,
        default=100,
        title="Max tokens",
        description="Maximum number of tokens to generate per output sequence.",
    )
    kwargs = Variable(Kwargs, title="Other parameters")

    my_model = MyModelClass()
    my_model.load()

    output_var = my_model.predict(prompt, num_tokens, kwargs)

    builder.output(output_var)

my_new_pipeline = builder.get_pipeline()
For the .yaml file, replace it with;
runtime:
  container_commands:
  - apt update -y && apt install -y software-properties-common python3-launchpadlib && apt update -y && add-apt-repository -y ppa:git-core/ppa && apt update -y
  - apt-get update
  - apt install -y gcc g++ aria2 git git-lfs wget openmpi-bin libopenmpi-dev
  - wget https://developer.download.nvidia.com/compute/cuda/12.1.0/local_installers/cuda_12.1.0_530.30.02_linux.run && sh cuda_12.1.0_530.30.02_linux.run --silent --toolkit
  - git clone https://github.com/NVIDIA/TensorRT-LLM.git
  - git clone https://github.com/google/gemma_pytorch.git
  python:
    version: '3.10'
    requirements:
    - pipeline-ai
    - tensorrt_llm -U --pre --extra-index-url https://pypi.nvidia.com
    - flax h5py sentencepiece easydict mpmath==1.3.0
accelerators: [nvidia_a100]
accelerator_memory: 39543
pipeline_graph: new_pipeline:my_new_pipeline
pipeline_name: gemma-7b-it-trt
description: null
readme: README.md
extras: {}
cluster: null
Now you can build this pipeline by running:
pipeline container build
And validate it works by running the container locally. This will create a mini-frontend app so you can test your model.
pipeline container up
Once we are happy with the pipeline you can deploy it to your Mystic account by running:
pipeline container push
This will then be available in your dashboard from where you can share it with the community or edit any other meta-data. If you want to deploy it to your own private cluster running in your own cloud account, check-out our BYOC integration: Mystic BYOC
Updated over 2 years ago