Deploy Mixtral 8x7B with Exllamav2
About Exllamav2
Exllamav2 brings us 2 great things. Very fast, optimized kernels and the ability to further control model quantization, with support for mixed quantization (i.e., some layers 2-bit, other layers 3-bit, etc.) and sparse quantization techniques, allowing for more efficient use of model parameters by applying higher precision to more critical weights and reducing the overall model size and computation requirements.
This combination of performance and granular compression makes Exllamav2 one of the fastest and most performant ways of running LLMs in GPU hardware, even in smaller GPUs.
This tutorial will cover how to deploy the 5-bit variant of Mixtral 8x7B on Mystic. After deploying you should expect this kind of performance:
| Required vRAM | GPU | Speed (tok/s) |
|---|---|---|
| 33 GB | 1x A100-40GB | ~ 52 tok/s |
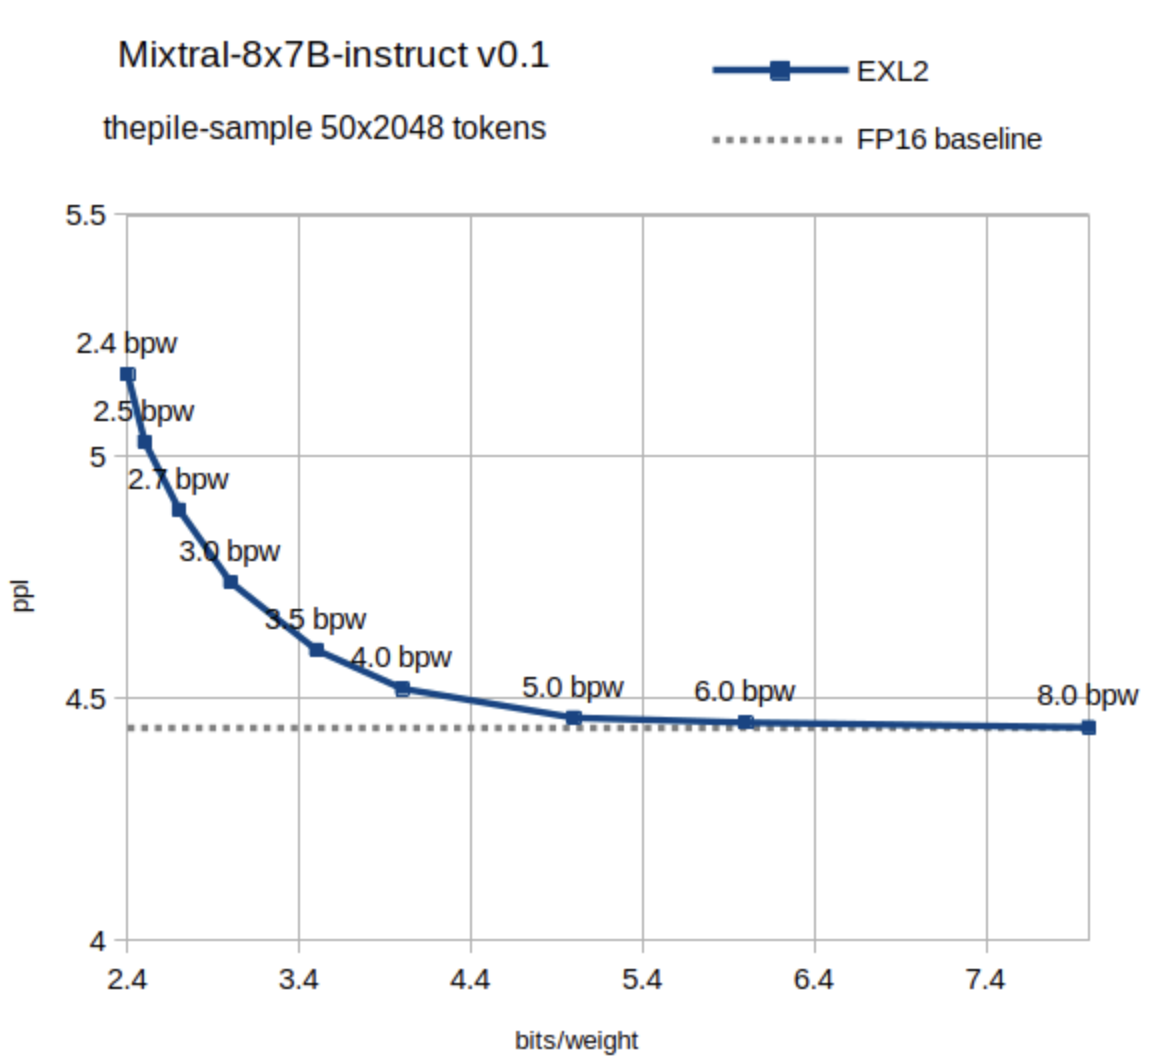
If you are curious about the perplexity (measure of how well the model predicts text, with lower values indicating better prediction accuracy) loss of a 5-bit quantised model, the graph below shows it actually maintains almost equal perplexity to a half precision (16-bit) model.

Tutorial
Let's start by creating a container project. In your terminal, after installing the latest pipeline-ai package, run the following:
pipeline container init -n mixtral-8x7b-instruct-5bit
In the directory you will see 3 newly generated files, a README, a .py, and a .yaml file.
On the auto-generated python file, replace its content with the following:
import os
os.environ["CUDA_HOME"] = "/usr/local/cuda"

from pipeline import Pipeline, Variable, entity, pipe
from pipeline.objects.graph import InputField, InputSchema
from typing import Optional

from exllamav2 import(
    ExLlamaV2,
    ExLlamaV2Config,
    ExLlamaV2Cache,
    ExLlamaV2Tokenizer,
)

from exllamav2.generator import (
    ExLlamaV2BaseGenerator,
    ExLlamaV2Sampler
)

import time
import torch


from huggingface_hub import snapshot_download
from pathlib import Path

class Kwargs(InputSchema):
    temperature: Optional[float] = InputField(0.99, title="Temperature", description="The temperature to use for sampling.")
    top_k: Optional[int] = InputField(100, title="Top k", description="The number of tokens to sample from.")
    top_p: Optional[float] = InputField(0.9, title="Top p", description="The cumulative probability to sample from.")
    mirostat: Optional[bool] = InputField(True, title="Mirostat", description="Whether to use mirostat sampling.")
    mirostat_tau: Optional[float] = InputField(5.0, title="Mirostat tau", description="The tau parameter for mirostat sampling.")
    repetition_penalty: Optional[float] = InputField(1.05, title="Repetition penalty", description="The repetition penalty to use.")
    template: Optional[str] = InputField("""[INST] {} [/INST]""",
                                         title="Template", description="The template to use for generation.", optional=True)

# Put your model inside of the below entity class
@entity
class MyModelClass:

    @pipe(run_once=True, on_startup=True)
    def setup(self) -> None:
        # Download model weights
        model_dir = Path("~/model").expanduser()
        model_dir.mkdir(parents=True, exist_ok=True)

        snapshot_download(
            "turboderp/Mixtral-8x7B-instruct-exl2",
            revision="5.0bpw",
            local_dir_use_symlinks=False,
            local_dir=str(model_dir))

        MODEL_WEIGHTS_PATH = str(model_dir)

        print("Loading model")
        # Initialize model and cache
        self.config = ExLlamaV2Config()
        self.config.debug_mode = True
        self.config.model_dir = MODEL_WEIGHTS_PATH
        self.config.prepare()

        self.model = ExLlamaV2(self.config)

        cache = ExLlamaV2Cache(self.model, lazy = True)
        self.model.load_autosplit(cache)

        self.settings = ExLlamaV2Sampler.Settings()
        self.tokenizer = ExLlamaV2Tokenizer(self.config)
        self.generator = ExLlamaV2BaseGenerator(self.model, cache, self.tokenizer)
        self.generator.warmup()
        print("Model loaded")

    @pipe
    def predict(self, prompt: str, max_new_tokens: int, kwargs: Kwargs) -> list[str]:
        self.settings.temperature = kwargs.temperature
        self.settings.top_k = kwargs.top_k
        self.settings.top_p = kwargs.top_p
        self.settings.token_repetition_penalty = kwargs.repetition_penalty
        self.settings.mirostat = kwargs.mirostat
        self.settings.mirostat_tau = kwargs.mirostat_tau

        # Remove/comment line below to disable EOS tokens
        self.settings.disallow_tokens(self.tokenizer, [self.tokenizer.eos_token_id])

        time_begin = time.time()
        output = self.generator.generate_simple(kwargs.template.format(prompt), self.settings, max_new_tokens, seed = 1234)
        time_total = time.time() - time_begin

        print(f"Response generated in {time_total:.2f} seconds, {max_new_tokens} tokens, {max_new_tokens / time_total:.2f} tokens/second")
        print(f"Memory allocated: {torch.cuda.max_memory_allocated(0)/ 1024**3:.2f}GB")
        # Remove input
        output = output[len(kwargs.template.format(prompt)):]
        return output


with Pipeline() as builder:
    prompt = Variable(str, default="If a train travels from City A to City B at a constant speed and encounters varying elevations along the way, \
                      how would these changes in elevation affect the train's fuel consumption and travel time?")
    max_new_tokens = Variable(int, default=150, title="Max tokens", description="Maximum number of tokens to generate per output sequence.")
    kwargs = Variable(Kwargs, title="Other parameters")

    my_model = MyModelClass()
    my_model.setup()

    output_var = my_model.predict(prompt, max_new_tokens, kwargs)

    builder.output(output_var)

my_new_pipeline = builder.get_pipeline()
For the yaml file, replace it with:
runtime:
  container_commands:
  - apt-get update
  - apt-get install -y git gcc g++ wget
  - apt-get install -y software-properties-common
  - apt-get update
  - wget https://developer.download.nvidia.com/compute/cuda/repos/debian11/x86_64/cuda-keyring_1.1-1_all.deb
  - dpkg -i cuda-keyring_1.1-1_all.deb
  - add-apt-repository contrib
  - apt-get update
  - apt-get -y install cuda-toolkit-12-3
  python:
    version: '3.10'
    requirements:
    - pipeline-ai
    - torch safetensors sentencepiece
    - exllamav2
    - huggingface_hub
accelerators:
- "nvidia_a100"
accelerator_memory: 33000
pipeline_graph: new_pipeline:my_new_pipeline
pipeline_name: mixtral-8x7b-instruct-5bit
description: Mixtral 8x7B 5bit implementation with exllamav2
readme: null
extras: {}
Now you can build this pipeline by running:
pipeline container build
And validate it works by running the container locally. This will create a mini-frontend app so you can test your model.
pipeline container up
or if you want to allow hot-reloading, you can run the container like:
pipeline container up -d
This will reload the container everytime you change (and save) your python file, which is useful while debugging.
You should always test your pipeline in a machine with a GPU before deploying it to Mystic.
Once we are happy with the pipeline you can deploy it to your Mystic account by running:
pipeline container push
This will then be available in your dashboard from where you can share it with the community or edit any other meta-data. If you want to deploy it to your own private cluster running in your own cloud account, check-out our BYOC integration: Mystic BYOC
Updated almost 2 years ago