
Run ComfyUI as an API
Deploy your ComfyUI workflow as a serverless endpoint with Mystic
ComfyUI is a visual tool that allows developers to build image generation workflows in an intuitive and highly customizable way. With ComfyUI you can do things like this:
"A nice house in the middle of the sea with pristine waters, 8k, ultra-realistic."

In this tutorial we will cover how to deploy your custom ComfyUI workflow as an API, leaving the autoscaling, GPU management, platform and cloud optimization to Mystic. By the end of this tutorial, you will have a scalable API endpoint from your ComfyUI workflow, suitable for production environments.
Step 1: Build your ComfyUI workflow
For this tutorial, I will assume you are familiar with ComfyUI and how it works. If not familiar, I'd recommend checking the main repo: https://github.com/comfyanonymous/ComfyUI
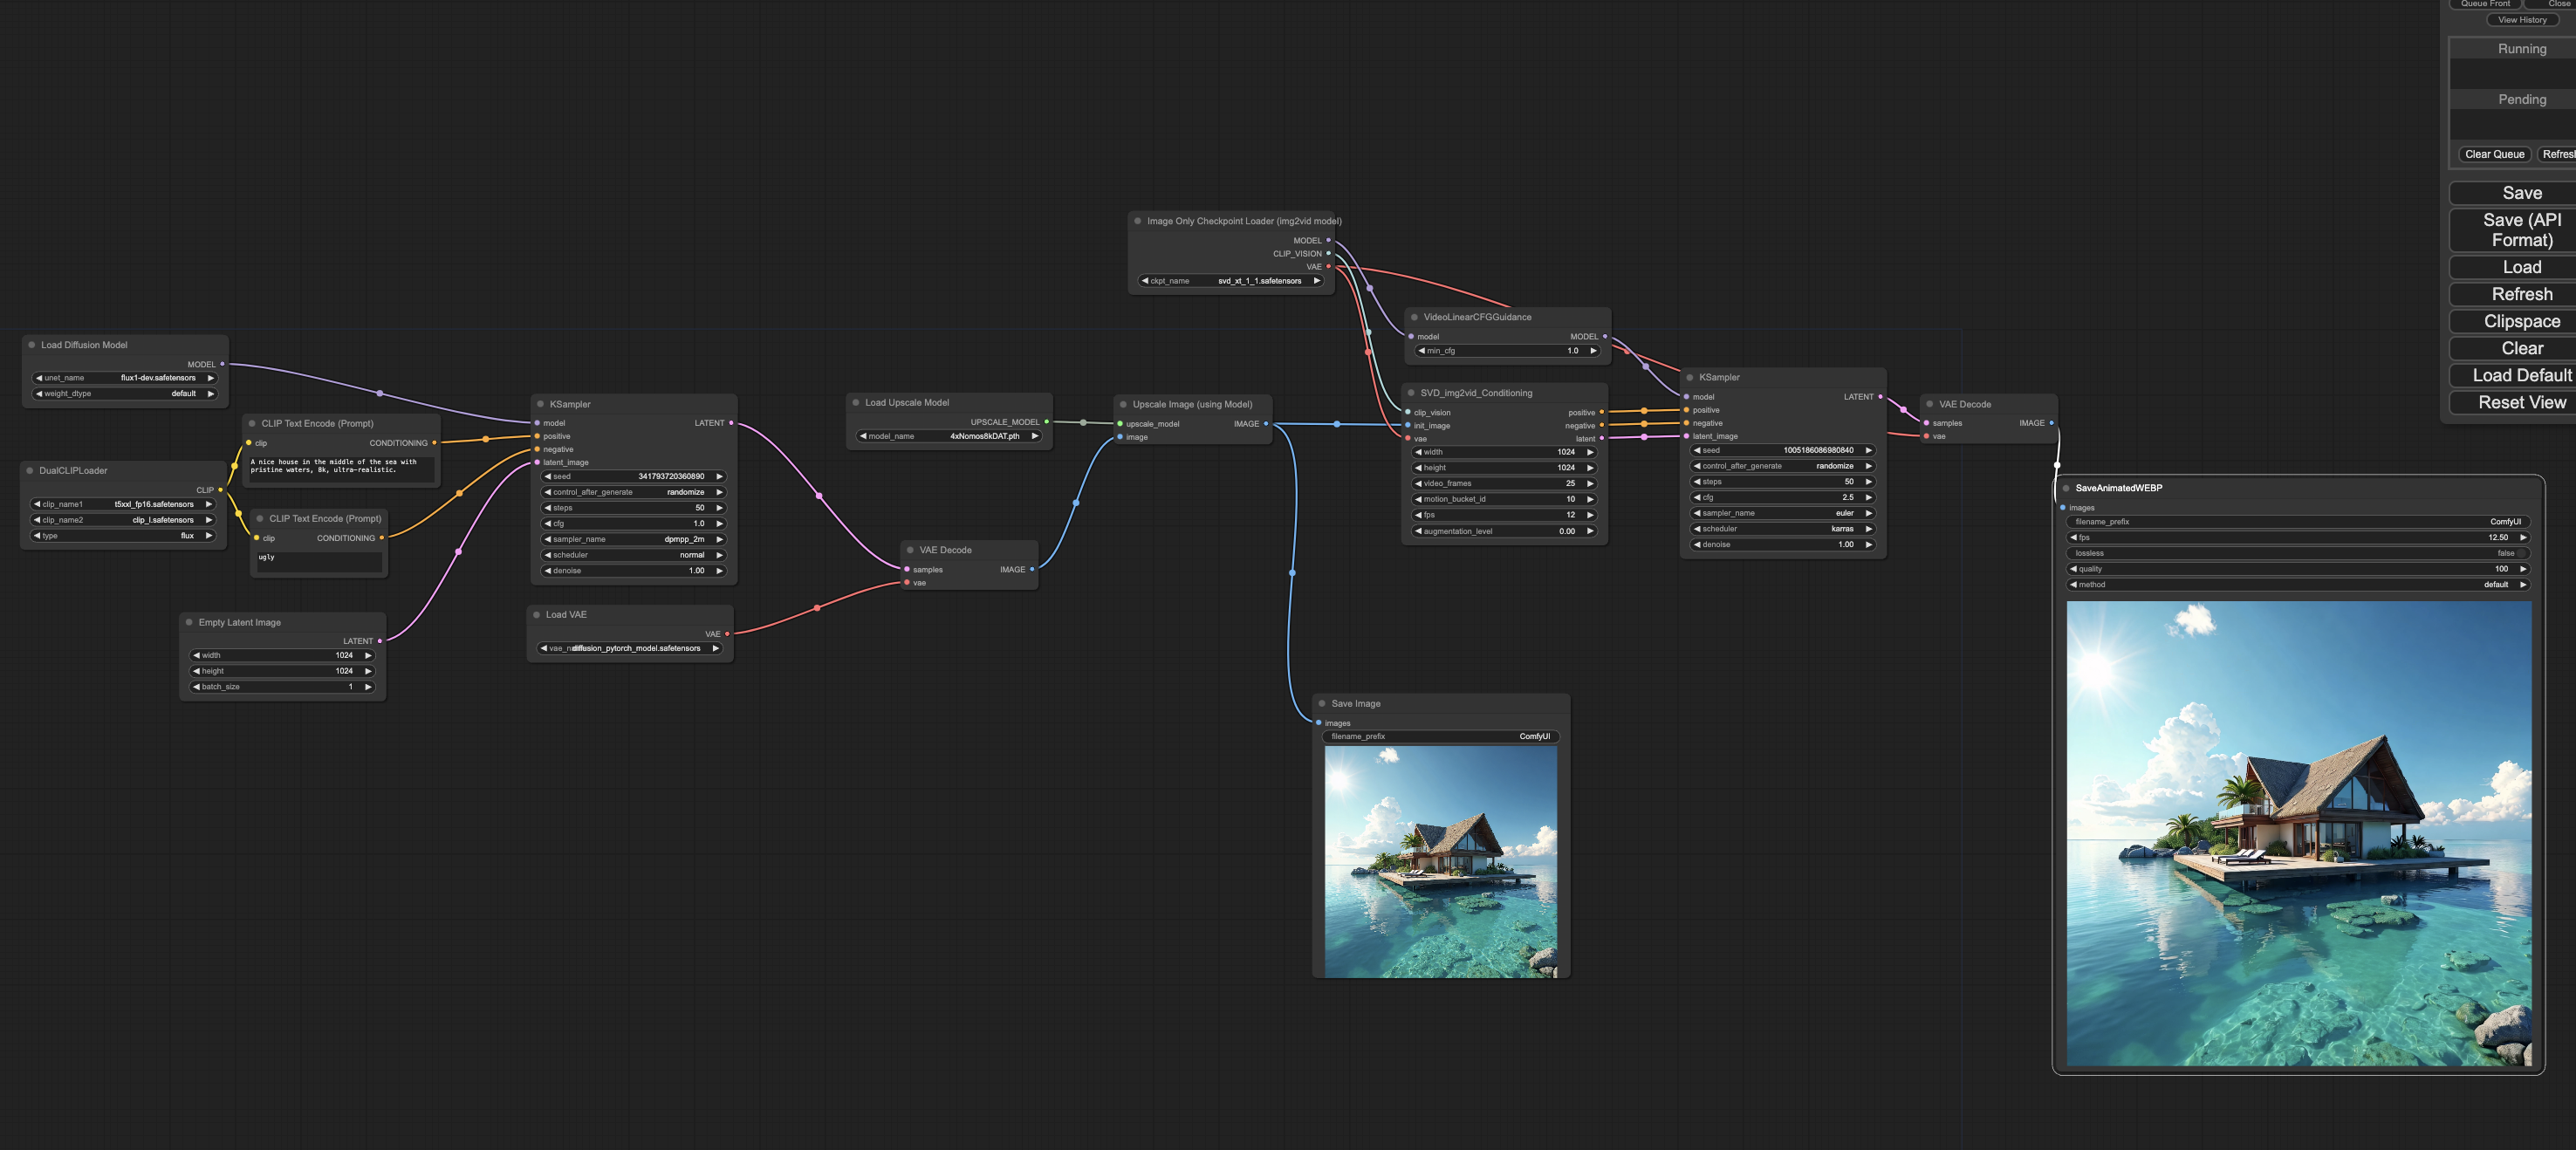
We are going to deploy a text-to-video ComfyUI workflow. This will take as input a prompt, then generate an image using Flux (https://huggingface.co/black-forest-labs/FLUX.1-dev), then upscale the image using a model called 4x-Nomos8kDAT (https://openmodeldb.info/models/4x-Nomos8kDAT) and finally generate a small GIF/video from this image using Stable Video Diffusion (SVD) 1.1 (https://huggingface.co/stabilityai/stable-video-diffusion-img2vid-xt-1-1). This workflow looks like this within ComfyUI:
Download the weights from the corresponding links and place it in the right ComfyUI model folders.
To export the workflow, you need to go to settings within your ComfyUI GUI, tick the "Enable Dev mode Options" box and a new option will pop-up in your menu (top-right side): Save (API Format). Click here to export the workflow as .json and save it in your main directory, we will need this for next step.
Step 2: Build your Mystic pipeline
If you haven't installed and authenticated with the Mystic Python SDK (pipeline-ai), check out our Quickstart. If you're new to Mystic, it's recommended to start with a simpler pipeline.
To deploy your ComfyUI pipeline, just like with any other pipeline, you will need 2 main files, a python file describing your Mystic endpoint and a yaml file with python requirements and other scaling configurations.
In the same directory where you cloned the ComfyUI repo, run the following commands:
pipeline container init -n comfyui-txt2vid
This will create the two main files that we will populate,pipeline.yaml and new_pipeline.py, as well as a README.md that you can attach too.
Your directory should contain now the following files:
ComfyUI, README.md, pipeline.yaml, new_pipeline.py, workflow.json
You can now replace the auto-generated new_pipeline.py python file with the following:
import websocket
import uuid
import json
import requests
import time
import subprocess
import os
from pathlib import Path
import threading

from pipeline import Pipeline, Variable, entity, pipe, File

COMFYUI_DIR = f"{os.path.dirname(os.path.abspath(__file__))}/ComfyUI"
comfy_workflow = f"{os.path.dirname(os.path.abspath(__file__))}/prompt_to_video.json"
port = 8970

@entity
class ComfyUIPipeline:
    def __init__(self, port=port):
        self.server_address = f"127.0.0.1:{port}"
        self.client_id = str(uuid.uuid4())
        self.ws = None
        self.workflow = None
        self.process = None

    @pipe(run_once=True, on_startup=True)
    def start_comfyui_server(self):
        # Start the ComfyUI server in a subprocess
        command = f"python main.py --port {port}"
        self.process = subprocess.Popen(
            command,
            cwd=COMFYUI_DIR,
            shell=True,
            stdout=subprocess.PIPE,
            stderr=subprocess.PIPE,
            preexec_fn=os.setsid
        )

        def stream_output(stream, label):
            while True:
                output = stream.readline()
                if output == b"" and self.process.poll() is not None:
                    break
                if output:
                    print(f"[{label}] {output.decode().strip()}", flush=True)

        # Start threads to read stdout and stderr
        threading.Thread(target=stream_output, args=(self.process.stdout, "STDOUT")).start()
        threading.Thread(target=stream_output, args=(self.process.stderr, "STDERR")).start()

    # Give some time for the server to start
    time.sleep(4)
    print("✨ ComfyUI server started")


    def retry_connect_websocket(self, ws_url, retries=5, delay=5):
        for attempt in range(retries):
            try:
                ws = websocket.create_connection(ws_url)
                print("✨ Connected to ComfyUI WebSocket server")
                return ws
            except ConnectionRefusedError:
                print(f"Connection attempt {attempt + 1}/{retries} failed. Retrying in {delay} seconds...", flush=True)
                time.sleep(delay)
        raise ConnectionRefusedError(f"Failed to connect to WebSocket server at {ws_url} after {retries} attempts.")


    def connect_websocket(self):
        ws_url = f"ws://{self.server_address}/ws?clientId={self.client_id}"
        self.ws = self.retry_connect_websocket(ws_url)

    def close(self):
        if self.ws:
            self.ws.close()
        if self.process:
            # Kill the process group to ensure all child processes are terminated
            os.killpg(os.getpgid(self.process.pid), subprocess.signal.SIGTERM)

    def queue_prompt(self, prompt):
        p = {"prompt": prompt, "client_id": self.client_id}
        data = json.dumps(p).encode('utf-8')
        url = f"http://{self.server_address}/prompt"
        response = requests.post(url, data=data)
        return json.loads(response.content)

    def get_image(self, filename, subfolder, folder_type):
        url = f"http://{self.server_address}/view"
        params = {"filename": filename, "subfolder": subfolder, "type": folder_type}
        response = requests.get(url, params=params)
        return response.content

    def get_history(self, prompt_id):
        url = f"http://{self.server_address}/history/{prompt_id}"
        response = requests.get(url)
        return json.loads(response.content)

    def wait_for_execution(self, prompt_id):
        while True:
            out = self.ws.recv()
            if isinstance(out, str):
                message = json.loads(out)
                if message['type'] == 'executing':
                    data = message['data']
                    if data['node'] is None and data['prompt_id'] == prompt_id:
                        break

    @pipe
    def load_workflow(self, prompt):
        # Load the workflow JSON
        with open(comfy_workflow, 'r') as f:
            self.workflow = json.load(f)
            self.workflow['6']['inputs']['text'] = prompt # Inject prompt into the workflow

    @pipe
    def start(self):

        self.connect_websocket()
        output_images = []

        try:
            print("✨ Starting ComfyUI pipeline")
            prompt_id = self.queue_prompt(self.workflow)['prompt_id']

            self.wait_for_execution(prompt_id) # Wait for execution to complete

            print("Execution completed")
            history = self.get_history(prompt_id)[prompt_id]

            # Process the output
            for node_id, node_output in history['outputs'].items():
                if 'images' in node_output:
                    for image in node_output['images']:
                        image_data = self.get_image(image['filename'], image['subfolder'], image['type'])
                        path = Path(f"/tmp/comfy_ui/{image['filename']}")
                        path.parent.mkdir(parents=True, exist_ok=True)
                        with open(path, "wb") as f:
                            f.write(image_data)
                        output_images.append(File(path=path, allow_out_of_context_creation=True))
        except:
            print("Error occurred while running Comfy workflow", flush=True)
            self.close()

        return output_images

with Pipeline() as builder:
    prompt = Variable(
        str,
        title="Image prompt",
        description="Prompt to generate video of",
        default="A nice house in the middle of the sea with pristine waters, 8k, ultra-realistic."
    )

    pipeline = ComfyUIPipeline()

    pipeline.start_comfyui_server()
    pipeline.load_workflow(prompt)
    output = pipeline.start()

    builder.output(output)

my_new_pipeline = builder.get_pipeline()
The above pipeline takes as input a text prompt, starts the ComfyUI server, loads the custom workflow, injects the input prompt within the json workflow and starts the ComfyUI execution. Once the workflow is finished it returns the images generated, in this case a .png and a .webp (still image and video).
You can modify the start function to return or save the images differently. Depending on your specific workflow you might need to take more inputs or return different outputs, consider this ComfyUI pipeline a template for your own workflow.
Debug pipeline locally (optional)
In your local machine (with a GPU), you can debug this pipeline locally without any docker involved by adding the following line of code,
output = my_new_pipeline.run("A nice house in the middle of the sea with pristine waters, 8k, ultra-realistic.")
You can then run this script using your favorite debugger or simply by running python my_pipeline.py assuming you have all the python libraries installed in your environment (you can look at the yaml file below to check what python packages you should install in your local environment).
Build pipeline
Once the pipeline file is done, the next step is to "build" the pipeline. This basically allows to build the docker image that will be pushed onto Mystic. To build your pipeline, you will need to make sure your yaml file is filled out. You can replace your auto-generated yaml file with the following,
runtime:
  container_commands:
  - apt-get update -y
  - apt-get install -y --no-install-recommends git gcc g++ wget
  - apt-get install -y --no-install-recommends software-properties-common
  - apt-get update -y
  - wget https://developer.download.nvidia.com/compute/cuda/repos/debian11/x86_64/cuda-keyring_1.1-1_all.deb
  - dpkg -i cuda-keyring_1.1-1_all.deb
  - add-apt-repository contrib
  - apt-get update -y
  - apt-get -y install --fix-missing cuda-toolkit-12-3
  python:
    version: '3.10'
    requirements:
    - pipeline-ai
    - torch
    - torchsde
    - torchvision
    - torchaudio
    - einops
    - transformers>=4.28.1
    - tokenizers>=0.13.3
    - sentencepiece
    - safetensors>=0.4.2
    - aiohttp
    - pyyaml
    - Pillow
    - scipy
    - tqdm
    - psutil
    - websocket-client
    - kornia>=0.7.1
    - spandrel
    - soundfile

accelerators: [nvidia_a100]
accelerator_memory: null
pipeline_graph: new_pipeline:my_new_pipeline
pipeline_name: comfyui
description: null
readme: README.md
extras:
    turbo_registry: true
cluster: null
scaling_config_name: null
This installs CUDA and all python dependencies required to run this workflow on remote machines.
Note, this yaml file enables turbo_registry, our custom Docker Registry built in Rust that loads Docker images up to 15x faster. If you don't have access to it, you will need to upgrade your Mystic account.
Now you can build this pipeline by running:
pipeline container build
You can validate the container builds and runs successfully by running the container locally. This will create a mini-frontend app so you can test your model. This step is optional, but highly recommended, as it's the final step before going to production. To do this, you can run the following command,
pipeline container up
You should always test your pipeline in a machine with a GPU before deploying it to Mystic.
Deploy pipeline to Mystic
Once we are happy with the pipeline you can deploy it to your Mystic account by running:
pipeline container push
And once upload is finished, that's it! Well done! You now have ComfyUI as a scalable API endpoint managed by Mystic.
This pipeline will then be available in your dashboard from where you can run it as an API and share it with the community if you want. If you want to deploy it to your own private cluster running in your own AWS/Azure/GCP account, check-out our BYOC integration for more details Mystic BYOC
Updated almost 2 years ago